Tuesday, May 1, 2012

"Beep beep beep beep beep!"


... aka robot cookies!

Check out these super cute 3-piece robot cookies!

Last week Jennifer emailed me requesting robot cookies for her little man's 3rd birthday. She sent me a picture of some really cool cupcakes and wondered if I could make something similar in cookie form instead. Of course!!! {Almost} anything is possible right?!?!

I opted for a rainbow colour pallete and was really excited {maybe even a little too excited!} to use my brand spankin' new Americolour Gourmet Writer pens to add the black details.
It just occured to me that I should have mixed up the pieces and made different robots...oh well, another time! I wonder if the birthday boy figured that out?!

The first time I saw 3-piece cookies was here. I think they're great! Not to mention you get to eat 3 cookies for the guilt of one ;) 

Photobucket

Monday, April 23, 2012

Fit for a Princess... or 2!


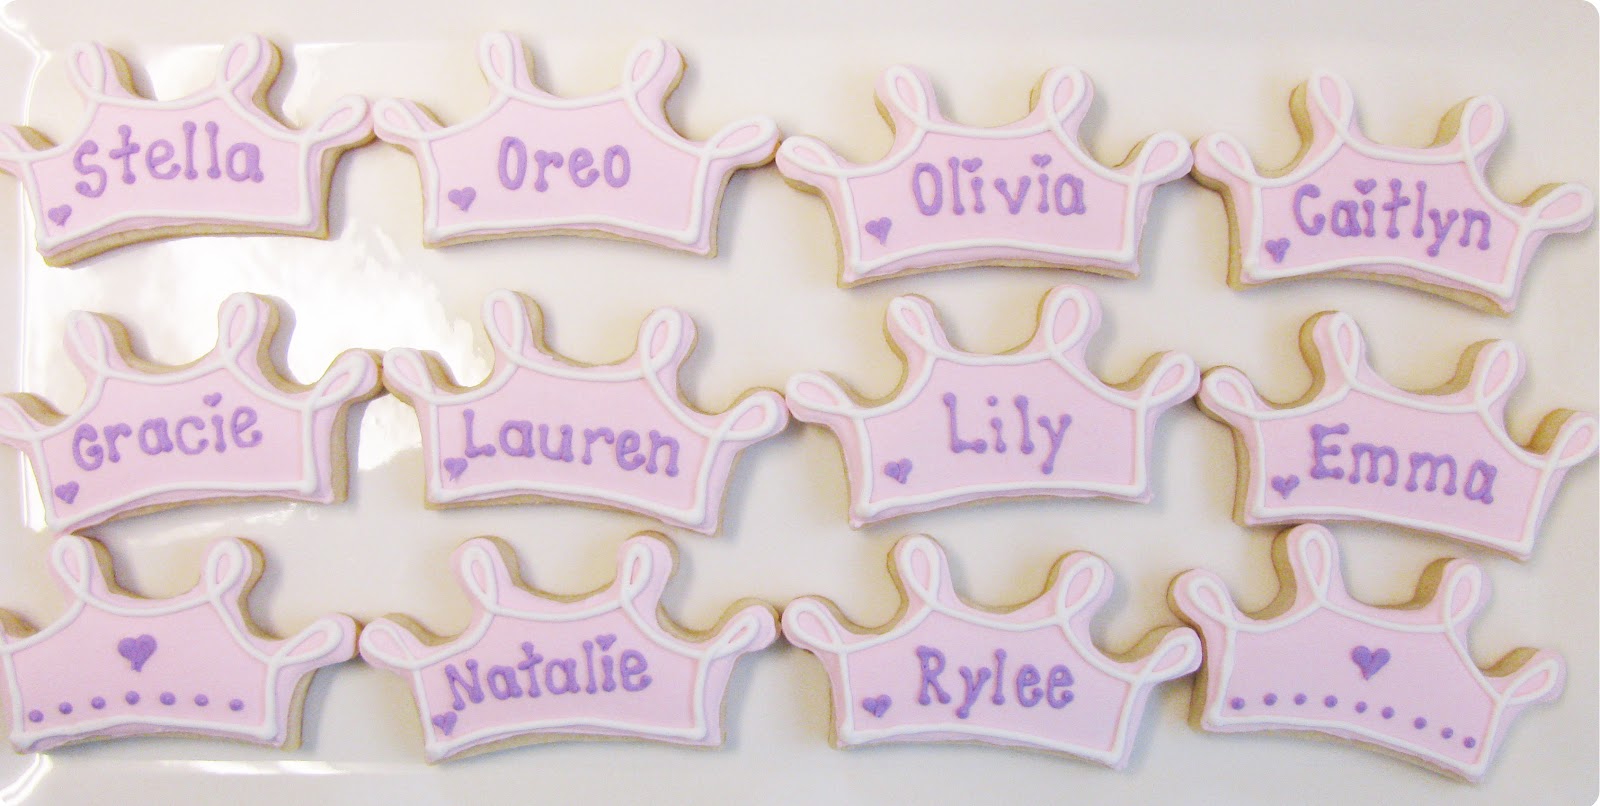
Ever since this post a couple of weeks ago my inbox has been flooded with requests for princess crown cookies. The princess phenomenon is nothing new to me {Kindergarten teacher and all :)} but I never thought there would be so many in my house so soon! It's great!!

These princess crown cookies were made for Stella and Grace's 7th birthday party. I have known the girls and their parents since they were born and it's hard to believe that they are 7 already!! The girls' mom, Corinne, requested crown cookies to double as party favours and I {of course} suggested to personalize them with each of the party-goers names. Oh how I LOVE that!!!! Guess she couldn't get away with no princesses 2 years in a row ;)

{If you look closely you can see a little sparkle!}

Cute right??!! I can't completely take credit though... check out my inspiration here!

I also made cupcakes for the girls' party...

I had to laugh when Corinne passed on their request for this years' treats... butterflies and flowers...just like last year!!! I laughed even harder when they exclaimed that they were "WAY better than last years!". That's a compliment right?!?! Haha! I didn't think last year's cupcakes were that bad!

Guess I have my work cut out for me next year ;)

Happy 7th birthday Stella and Gracie!!

Photobucket

Wednesday, April 11, 2012

Cookie Favours and Personalized Tags ... Works for Me Wednesday


Wouldn't you love to get one of these?

I know I would! But maybe I'm biased... ;)

In the past couple months cookie party favours have really taken off in my baking life. Given  my new found obsession for everything cookie I am beyond thrilled! It has been a win-win situation all around... I get to make beautiful, delicious cookies, my clients have a one-stop-shop for Thank You gifts and party go-ers are excited to leave with a yummy treat!

BUT no party favour would be complete without a personalized tag. Tags not only say "Thanks for coming!", they also look really cute!


{oops...its a little blurry...sorry ;)}

Here are some tips I have/things I do to create the perfect personalized tag for cookie favours:

Use Photoshop!! It takes some practice and a lot of googling {if you're somewhat computer illiterate like me!} but I love that you can create moveable layers. I almost NEVER like the first tag I design and print off. Either the text is too small, the picture isn't right or the placement of everything is off. Photoshop is awesome for making small changes without redoing the whole thing. If you don't have Photoshop, no worries!! Gimp is available FOR FREE download online. It is a similar program and, did I mention, FREE??!! Gotta love that!

Cute fonts are available everywhere online. You aren't limited to the ones that came with your computer!!! Here are some of my favourites:
Once I have designed a tag I save it as a jpeg, open up a new Word document, view it at 100% and open up the image. The next part is super scientific... ha! I take one of my finished cookies, put it in a small candy bag, twist the top and hold it up to the screen to check for size. I know, I know...probably not the best way but this is Works for Me Wednesday right??!!

Once the size of the tag is adjusted I simply cut and paste it as many times as it will fit onto the Word document. Print it off, cut each one out, hole punch the corner and voila! A beautiful tag to go alongside your beautiful cookie!

Such a simple and thoughtful DIY way to thank your guests!
Photobucket

Saturday, April 7, 2012

chirp chirp chirp chirp...


Happy Easter!

How is your sugar intake so far this weekend?!

Just a quick post tonight to share some pretty little chick cookies to celebrate Spring and Easter. I made these cookies for my own Kinders this year before Spring Break and for my awesome friend Elissa`s Kinders for Easter. I don`t know about Elissa`s students but mine were REALLY excited to get a chick cookie... maybe they just want me to make them goodies more often ;) Hehe!


All packed up and ready to go!


I hope you all have a wonderful holiday full of turkey, chocolate and family!

Photobucket

Wednesday, March 28, 2012

Stamp Embossed Fondant Cupcake Decorations... Works for Me Wednesday


*...and a long post to go with a really long title!*

I have a confession to make...

Sometimes I steal. Well, okay, not really steal... but more like take a look around for ideas :) That sounds much better doesn't it!

It's kind of a hazard of having your own blog. You become obsessed with other peoples' blogs. You want to know what they are doing, how they are doing it and when you can start doing it! On any given day I can be found on my computer gathering ideas and inspiration for my own baking projects. Pinterest doesn't help ;)

As much as I love to check out my fellow bloggers' work I also love to share. I guess I wouldn't be here otherwise!

So, my obsession with baking blogs, my love of sharing and all the "How did you do that?" questions I have fielded over the years have led me here... Works for Me Wednesday. Works for Me Wednesday (WFMW) is a blog linky party hosted by the amazing Kristen over at We are THAT Family. Every Wednesday bloggers link up their tips, tricks and tidbits that have made their lives easier. It's a big old share-fest! And now I've decided that it's time to get in on the action!

Today's Works for Me Wednesday..... stamp embossed fondant decorations...


It is fitting that I have chosen to start off WFMW on the Sweets & Sprinkles blog with stamp embossed fondant decorations because it is the very first fondant technique I learned when planning my own wedding. I saw beautiful, monogrammed cupcakes on the Martha Stewart website {here} and had to figure out exactly how to get the same look! It is actually quite simple to do and is still one of my favourite looks for cupcakes.

Here's what you need:

Just a few things to note...
  • I use cornstarch on my work surface to prevent the fondant from sticking when rolled out. I have read that icing sugar also does the trick but I always end up wearing it so I avoid it if I can! I have enough icing sugar in my life as it is!!
  • I prefer rubber stamps to acrylic. I'm sure that acrylic work just fine but I like the cushion of a rubber stamp better. I don't actually know if it makes a difference in the end but it makes sense to me! Never tried acrylic, gonna stick to rubber!
Now we're ready to start!

First prep your work surface with a sprinkle of corn stach and roll the fondant out fairly thin. I use the rings on my rolling pin as a guide. If there is a little corn starch on the "good" side of your fondant brush it off with your fingers now. It will be much harder to get off after the fondant is stamped.


Next, stamp your fondant! You want to use a firm pressure so that the image is transfered deep enough into the fondant. Too light and the image won't be visible, too hard and the fondant will stick to the stamp leaving you with a distorted, possibly torn image. I rock the stamp a tiny bit with my fingers to make sure that I have pressed all sides of it evenly into the fondant.


Place your cutter over the stamped fondant making sure the image underneath is positioned correctly.


And cut!


Easy right?! And so pretty!

Monogrammed cupcake decorations are also stamped using this technique...


Here it is SUPER important to stamp the fondant first so that you can accurately position the cutter. If you cut first it is hard to see exactly where you are stamping on the shape.

Another tip... notice how I cut my rubber stamp above? When I bought this set of alphabet stamps the capital and lowercase letters were one piece. I peeled the rubber off, cut it into two and now just use the one letter I need. The tree stamp below is one of my favourites. I have never actually used it as a tree! But I love the swirly pattern and it translates really well to fondant. The trick is to find a pattern you love that is the right size for your cutter. No one ever asks "Is that a tree stamp you used?"!!


The finished product! Let your decorations harden overnight and they are ready to use!


I am sure that this isn't the only way of stamping fondant, its just the way that works for me!

Happy stamping!!
Photobucket

Tuesday, March 27, 2012

An All-Inclusive Celebration


Although the weather has been unusually beautiful for this time of year on the good 'ol prairies there is just something about Spring Break that has me longing for a hot, all-inclusive getaway. I actually long for a hot, all-inclusive vacation approximately 295 days of the year, but who's counting?! Regardless, here I am, stuck in landlocked Winnipeg this week, catching up on some reading and getting the oil changed in my car... jealous? Ha!

All of this all-inclusive business makes me think about indulgence and that makes me think about the triple threat... cakes, cupcakes and cookies. Annnndddd.... a couple of weekends ago I made all 3 goodies for a double-y delicious 1st birthday celebration. An obvious, yet clever, segway if I do say so myself! See how it all comes together in my head ;)

The story of this 1st birthday celebration is a pretty cool one. My friend Kelly had her son, Makai, a year ago. Her sister was pregnant at the same time with her son, Kian. The two boys were born just days apart and so the joint birthday party madness began!

Kelly contacted me about making cupcakes, 2 cakes (one for each birthday boy) and favour cookies for the party. They had chosen a space theme and requested star cupcakes, rocketship cakes and #1 cookies. And so the all-inclusive {Sweets 'n Sprinkles style} birthday party madness began!

The cupcakes and cookies....


...and my absolute favourite cookies that I've ever made EVER!!!
Warning - I took a lot of pictures of these cookies! They were so cute and I was excited!!
Please bear with me :)


I never miss an opportunity to put a monogram {or 2} on anything!


All packed up and ready to go! How cute is this?!


A table full of cookies at the door for party goers to grab on their way out!


I am such a huge fan of the cookie party favour! Who doesn't like to get a delicious sugar cookie to take home {or eat in the car on the way home.... or maybe that's just me}?!

Check out the cupcakes I made for Kelly's baby shower when Makai was just a babe here.

For those of us "lucky" enough to stay in the 'Peg for Spring Break a triple c all-inclusive party might be just the cure for all this vacay-envy going on right now!

Just checked the weather forecast for the week...snow....awesome...

Photobucket

Monday, March 19, 2012

Mila's Baptism Celebration & an alternative to pink!


A couple of weekends ago I had the pleasure of making cupcakes for Mila's baptism. Mila's mom, Carla, emailed me requesting pretty, NOT pink cupcakes for the occasion! I do a lot of pink for baby girls so this was a nice change and a bit of a challenge at the same time.

We decided on shades of white, cream and ivory for the overall look. Carla was also incorporating lace into the theme of the party so I suggested lace cupcake wrappers. Definitely very classic and elegant... not to mention, very cost effective!

Mila's cupcakes were lemon with buttercream icing and vanilla with mocha icing - delish!! The mocha icing added a nice pop of colour.


Stamp embossed crosses...


...and, of course, {my favourite} stamped monograms with the baby of honour's initial!


What I absolutely l.o.v.e. about this cupcake stand {see here} is that it can
hold a sign! How fun is that!! Admittedly I am much better with fondant
than photoshop but I may have a new cupcake stand sign obsession!!


Photobucket
Related Posts Plugin for WordPress, Blogger...