Pages

Wednesday, March 28, 2012

Stamp Embossed Fondant Cupcake Decorations... Works for Me Wednesday

*...and a long post to go with a really long title!*

I have a confession to make...

Sometimes I steal. Well, okay, not really steal... but more like take a look around for ideas :) That sounds much better doesn't it!

It's kind of a hazard of having your own blog. You become obsessed with other peoples' blogs. You want to know what they are doing, how they are doing it and when you can start doing it! On any given day I can be found on my computer gathering ideas and inspiration for my own baking projects. Pinterest doesn't help ;)

As much as I love to check out my fellow bloggers' work I also love to share. I guess I wouldn't be here otherwise!

So, my obsession with baking blogs, my love of sharing and all the "How did you do that?" questions I have fielded over the years have led me here... Works for Me Wednesday. Works for Me Wednesday (WFMW) is a blog linky party hosted by the amazing Kristen over at We are THAT Family. Every Wednesday bloggers link up their tips, tricks and tidbits that have made their lives easier. It's a big old share-fest! And now I've decided that it's time to get in on the action!

Today's Works for Me Wednesday..... stamp embossed fondant decorations...


It is fitting that I have chosen to start off WFMW on the Sweets & Sprinkles blog with stamp embossed fondant decorations because it is the very first fondant technique I learned when planning my own wedding. I saw beautiful, monogrammed cupcakes on the Martha Stewart website {here} and had to figure out exactly how to get the same look! It is actually quite simple to do and is still one of my favourite looks for cupcakes.

Here's what you need:

Just a few things to note...
  • I use cornstarch on my work surface to prevent the fondant from sticking when rolled out. I have read that icing sugar also does the trick but I always end up wearing it so I avoid it if I can! I have enough icing sugar in my life as it is!!
  • I prefer rubber stamps to acrylic. I'm sure that acrylic work just fine but I like the cushion of a rubber stamp better. I don't actually know if it makes a difference in the end but it makes sense to me! Never tried acrylic, gonna stick to rubber!
Now we're ready to start!

First prep your work surface with a sprinkle of corn stach and roll the fondant out fairly thin. I use the rings on my rolling pin as a guide. If there is a little corn starch on the "good" side of your fondant brush it off with your fingers now. It will be much harder to get off after the fondant is stamped.


Next, stamp your fondant! You want to use a firm pressure so that the image is transfered deep enough into the fondant. Too light and the image won't be visible, too hard and the fondant will stick to the stamp leaving you with a distorted, possibly torn image. I rock the stamp a tiny bit with my fingers to make sure that I have pressed all sides of it evenly into the fondant.


Place your cutter over the stamped fondant making sure the image underneath is positioned correctly.


And cut!


Easy right?! And so pretty!

Monogrammed cupcake decorations are also stamped using this technique...


Here it is SUPER important to stamp the fondant first so that you can accurately position the cutter. If you cut first it is hard to see exactly where you are stamping on the shape.

Another tip... notice how I cut my rubber stamp above? When I bought this set of alphabet stamps the capital and lowercase letters were one piece. I peeled the rubber off, cut it into two and now just use the one letter I need. The tree stamp below is one of my favourites. I have never actually used it as a tree! But I love the swirly pattern and it translates really well to fondant. The trick is to find a pattern you love that is the right size for your cutter. No one ever asks "Is that a tree stamp you used?"!!


The finished product! Let your decorations harden overnight and they are ready to use!


I am sure that this isn't the only way of stamping fondant, its just the way that works for me!

Happy stamping!!
Photobucket

Tuesday, March 27, 2012

An All-Inclusive Celebration

Although the weather has been unusually beautiful for this time of year on the good 'ol prairies there is just something about Spring Break that has me longing for a hot, all-inclusive getaway. I actually long for a hot, all-inclusive vacation approximately 295 days of the year, but who's counting?! Regardless, here I am, stuck in landlocked Winnipeg this week, catching up on some reading and getting the oil changed in my car... jealous? Ha!

All of this all-inclusive business makes me think about indulgence and that makes me think about the triple threat... cakes, cupcakes and cookies. Annnndddd.... a couple of weekends ago I made all 3 goodies for a double-y delicious 1st birthday celebration. An obvious, yet clever, segway if I do say so myself! See how it all comes together in my head ;)

The story of this 1st birthday celebration is a pretty cool one. My friend Kelly had her son, Makai, a year ago. Her sister was pregnant at the same time with her son, Kian. The two boys were born just days apart and so the joint birthday party madness began!

Kelly contacted me about making cupcakes, 2 cakes (one for each birthday boy) and favour cookies for the party. They had chosen a space theme and requested star cupcakes, rocketship cakes and #1 cookies. And so the all-inclusive {Sweets 'n Sprinkles style} birthday party madness began!

The cupcakes and cookies....


...and my absolute favourite cookies that I've ever made EVER!!!
Warning - I took a lot of pictures of these cookies! They were so cute and I was excited!!
Please bear with me :)


I never miss an opportunity to put a monogram {or 2} on anything!


All packed up and ready to go! How cute is this?!


A table full of cookies at the door for party goers to grab on their way out!


I am such a huge fan of the cookie party favour! Who doesn't like to get a delicious sugar cookie to take home {or eat in the car on the way home.... or maybe that's just me}?!

Check out the cupcakes I made for Kelly's baby shower when Makai was just a babe here.

For those of us "lucky" enough to stay in the 'Peg for Spring Break a triple c all-inclusive party might be just the cure for all this vacay-envy going on right now!

Just checked the weather forecast for the week...snow....awesome...

Photobucket

Monday, March 19, 2012

Mila's Baptism Celebration & an alternative to pink!

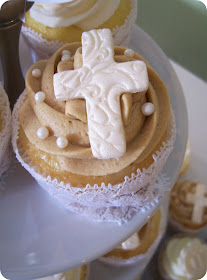
A couple of weekends ago I had the pleasure of making cupcakes for Mila's baptism. Mila's mom, Carla, emailed me requesting pretty, NOT pink cupcakes for the occasion! I do a lot of pink for baby girls so this was a nice change and a bit of a challenge at the same time.

We decided on shades of white, cream and ivory for the overall look. Carla was also incorporating lace into the theme of the party so I suggested lace cupcake wrappers. Definitely very classic and elegant... not to mention, very cost effective!

Mila's cupcakes were lemon with buttercream icing and vanilla with mocha icing - delish!! The mocha icing added a nice pop of colour.


Stamp embossed crosses...


...and, of course, {my favourite} stamped monograms with the baby of honour's initial!


What I absolutely l.o.v.e. about this cupcake stand {see here} is that it can
hold a sign! How fun is that!! Admittedly I am much better with fondant
than photoshop but I may have a new cupcake stand sign obsession!!


Photobucket

Sunday, March 18, 2012

Can you tell me how to get to Sesame Street... and how to be a little less forgetful perhaps?!

Some days, s{tuff} happens...

{thank you Forrest Gump}

This was one of those days.

Generally, my plan is to always set up my cupcakes at the venue of the event they are for. I know that my clients appreciate it greatly but, if I'm being completely honest, it's mostly because I'm a wee bit of a control freak {or "detail oriented" as my mom so lovingly refers to it ;)}! Please note: this is in no way intended to be a slight against anyone's abilities to put some cupcakes on a stand. It's just a thing I have... its incurable. Trust me, I've tried.

Anyways, on the morning of Landon's birthday party I had a commitment that I just couldn't get out of and had to drop everything off beforehand. Of course it wasn't until I arrived that I realized my error. I hadn't taken any pictures of the cupcakes or the cake. Not.One.Single.Picture.

For a blog lovin', picture sharing kinda girl like me that is just about as close to the end of the world as it is gets.

Luckily Landon's lovely mom, Elaine, was kind enough to send me a couple of snaps she took and all was not lost. Thank you for saving the day Elaine!!

I have to say that I LOVE the cake on top of the stand and cupcakes below. It is the best of both worlds!


Aren't they cute?!

Note to self... pictures are important in this business!

One more week until Spring Break!! Hopefully my brain comes back...

Photobucket

Monday, March 5, 2012

I do... do you?

It's March... officially the time of year when wedding fever strikes and all those summer brides start to think about cake. Mmmm... cake... or, in this case, cupcakes! When I was planning my wedding it was a whole lot of hurry up and slow down. I seem to remember spring as a "hurry up" time. The final push to get everything booked before the other August brides! Must.Be.First. It's a battlefield out there...

To honour the fifth, and craziest season of all {wedding season} I share with you Unity and Sean's delectable display of red deliciousness! I have to say that I {heart} a red velvet cupcake for many reasons. First of all, taste. Easy. Second of all, beauty. They just look pretty all lined up against a white cupcake stand! Unity and Sean`s wedding colours were red and silver so there really was no other option ;)


The cupcakes were topped with buttercream icing swirled to look like a rose. Very pretty and elegant. It is a little hard to tell in the picture but I also sprayed the cupakes with pearl Colour Mist to give them a little shimmer. I forsee myself using A LOT of this stuff in the future... better invest in some stock!


And lastly, the cutting cake to complete the look. I also swirled icing on the sides to look like roses. I first saw this technique HERE and really liked the way it looked. Smaller roses on the side would have also been pretty. Next time! 


Congrats Unity and Sean! I really enjoyed working with you {and Mom too!}.

Cue the sigh of relief that only comes after the wedding day is over....

Photobucket